Chunky Sausage Lentil Soup

This recipe has been the most asked for meal EVER in my household. It’s safe to say that this is my love’s all time favorite. It’s super tasty, easy, and filling. Definitely a great recipe to add to your list for fall and winter meals.

The original recipe came from Taste of Home. At first, I thought there were a few things about it that seemed a bit off. The first being the 2 medium onions. “Whoa!”, that seemed like a whole lat-tah onion.” Second was the 1 red potato . “That’s all? Just 1? Are you sure about that?”, it didn’t sound like enough. Thirdly was the optional salad croutons. “What the heck? Who ever heard of adding salad croutons to soup? ” Ok, ok, maybe it makes some sense. People do add crackers to their soup so I guess it’s not a huge leap. I’m not crazy about the idea so I’ve always left them out.

I’ll be honest, the first few times I made this I tried altering the amount of onion and potato. Eventually, I went ahead and made the recipe as written. It worked just fine. No adjustments needed, except those pesky croutons.

For the sausages, we would alternate between Spicy Italian Sausages and Sweet Italian Sausages, or do a combination of both. Here in Spain however I haven’t seen any Italian Turkey Sausages, which has led to trying some new sausage alternatives. One of those alternatives was Chistorra, which is a smokey sausage that originates from the Basque Country. I loved it! This time we tried something different. We used two different kinds of fresh sausages. Both of them are Longaniza, but was called Longaniza Rojo and was red in color (with paprika maybe?? package only said “spices”). They are both similar to chorizo and the Portuguese linguica. They worked great!

I’m still getting used to European measurements. Converting my recipes from home has been a bit of a learning curve. The packages of dried lentils here come in 1 kilogram bags. 1 kilogram equals 35 or so ounces, so I eyeballed half a bag. There was a bit more lentils and less broth than I would normally like but it was still really good. Maybe my eyeball was a little big this time. My suggestion is to trust your instincts. When you’re adding in the cooked lentils, if it looks like you may have too much, leave the rest out.

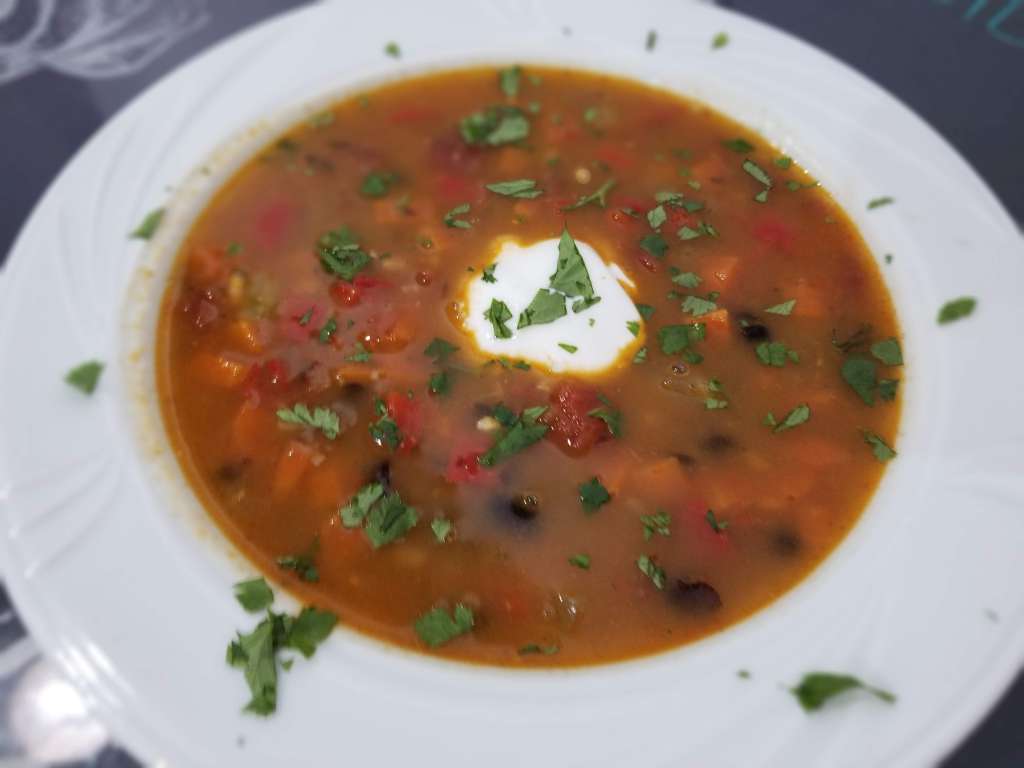
What’s most important is that this recipe was as good as expected. It will definitely continue to be on our fall/winter rotation. I hope you will give it a try and will enjoy it as much as we do!

Chunky Sausage Lentil Soup

Serves: 8 to 10, depending on how big a bowl you want

  • 8 cups water
  • 1 16 oz package (1/2 of a 1 kg bag) of dried lentils, rinsed
  • 1 19.5 oz (550 g) package Italian Sausage, Chistorra, or Longaniza , casings removed , if possible
  • 2 medium onions, chopped
  • 2 celery ribs, chopped
  • 2 medium carrots, cut into 1/4″ slices
  • 6 garlic cloves, minced
  • 43.5 oz (1.25 liters) reduced-sodium (if possible) beef broth
  • 28 oz (800 g) crushed (triturado) tomatoes
  • 1 medium red potato or a few new potatoes, diced
  • 1 1/2 teaspoon dried thyme
  • 1 1/2 teaspoon ground pepper

In a large saucepan, bring water and lentils to a boil. Reduce heat; cover and simmer for 18 to 22 minutes or until lentils are tender. Drain and set aside.

In a large saucepan, cook the sausages, onions, celery, and carrots over medium heat until meat is no longer pink and vegetables are tender. Add garlic and cook 2 minutes longer.

Stir in the broth, tomatoes, potatoes, thyme and pepper. Bring to a boil. Reduce heat to a simmer, uncovered, for approximately 15 to 20 minutes or until potatoes are tender. Stir in cooked lentils and heat through. Serve!

Carne Asada Burritos

I was born and raised in San Diego, California where Mexican food is front and center. Tacos, burritos, margaritas….you get it.

Carne Asada Burrito

Lots of people ask us what we miss the most from home. Besides the obvious family and friends, it would have to be Mexican Food. I mean, the kind you find in Southern California, like Carne Asada Burritos.

Ever since we arrived in Valencia we made it our mission to find a good Mexican Restaurant. Surprisingly, there are quite a few Mexican restaurants here. We’ve tried three so far. Two of them really stood out (Enchilame and Taqueria La Llorona).

Margarita On the Rocks

Enchilame had some tasty tacos and an interesting margarita on the rocks. Imagine a fresh, homemade margarita using freshly squeezed limes and a shot of tequila. No sugar. Served like a martini. Maybe someone forgot to make the simple syrup?? It was interesting. A little tart but interesting. They didn’t have anything like carne asada burritos but we really enjoyed their tacos.

Tacos from Enchilame

Taqueria La Llorona had some really good tacos too but no carne asada burritos. We would definitely go back to either place for tacos.

Tacos from Taqueria La Llorna

I’ve really been craving a good ‘ole Southern California Carne Asada Burrito. Sometimes you just need to take matters into your own hands. So this Southern Cali girl decided to make her own. I set out to Mercat Central where there are butchers and International food vendors. For flank steak go see Carnicas Maria Lloria and ask for Falda/Vacio. We got the chipotle in adobo sauce from Mr. Chipotle and right next door at Tropicalmente Herbasana we found fresh jalapeno, a large bunch of cilantro, and huge avocados. Now, I just needed to put it all together.

Carne Asada Marinade

Serves 6

  • 1/4 cup and 2 tablespoons orange juice
  • 1/4 cup lemon juice
  • 2 tablespoons and 2 teaspoons lime juice
  • 3 garlic cloves, crushed and minced
  • 1/4 cup soy sauce
  • 1 chipotle pepper in adobo sauce, finely chopped
  • 1 1/2 teaspoons chili powder – optional
  • 1 1/2 teaspoons ground cumin
  • 1 1/2 teaspoons paprika
  • 1/2 teaspoon dried oregano
  • 1 1/2 teaspoons ground black pepper
  • 1/2 bunch fresh cilantro, chopped
  • 1/4 cup olive oil
  • 1 1/2 lbs (1/2 kilo) flank steak (falda/vasio in Spain)
  • 6 Burrito sized tortillas
  • Pico de Gallo (see below)
  • Guacamole (see below)
  1. Combine orange, lemon, and lime juices in a large bowl along with the garlic, soy sauce, chipotle pepper, spices, and cilantro. Slowly whisk in the olive oil until well combined in marinade. Reserve 1/2 cup for use after the meat is cooked.
  2. Place the flank steak between heavy plastic or paper (zip-lock bag or butcher paper) on a solid surface. Firmly pound the stead with the smooth side of a meat mallet to a thickness of 1/4 inch. After pounding, poke steak all over with a fork. Add the meat to the marinade in the large bowl, cover, and marinade in the refrigerator for 24 hours.

The next day prepare the guacamole and pico de gallo salsa, before cooking the meat.

Guacamole

  • 2 medium or 1 large ripe avocado – cubed
  • 1 1/2 roma tomatoes – diced
  • 1/4 red onion – finely chopped
  • 1/2 fresh jalapeno – finely diced
  • 1/4 cup cilantro – chopped
  • juice of 1/2 lime
  • 1/4 teaspoon salt

Combine all ingredients, being careful not to over mix. You want it to be a little chunky.

Pico de Gallo

  • 1/4 red onion – finely diced
  • 1/2 fresh jalapeno – finely diced
  • juice of 1/2 lime
  • 1/4 teaspoon salt
  • 1 1/2 roma tomatoes – finely diced
  • 1/4 cup cilantro – finely diced

Combine the red onion, jalapeno, lime and salt. Let marinate while you dice the tomato and cilantro. This will combine the flavors a bit more. Add chopped tomatoes and cilantro, combine. Place in an airtight container and refrigerate for at least 15 minutes. Pico de gallo will be good for 4 days in the refrigerator. Serve with a slotted spoon or fork. You don’t want too much moisture from the lime juice and /or tomato juice when adding to your burrito.

Cook Meat

You want to cook your meat over a quick, high heat. You can:

  • Grill – approximately 4 to 8 minutes per side
  • Broil – approximately 4 to 8 minutes per side
  • On the stove – approximately 4 to 8 minutes per side

Cooking time can vary depending on the thickness of the meat. If you use an instant read thermometer you’ll want a reading of 130-140 F for medium rare. We like to cook to medium rare.

Lightly oil the cooking vessel you choose. Remove the steak from the marinade and grill to desired doneness. Discard used marinade. Remove meat from heat and slice across the grain. Than chop. Add reserved marinade to warm steak.

Warm up a tortilla, 30 seconds in microwave or stovetop (flipping over several times). Add about a half cup of meat into the middle of tortilla. Add about 2 tablespoons of pico de gallo, to taste and add about a 1/4 cup of guacamole. Fold in sides of tortilla and roll tortilla over filling.

What’s one of your favorite Mexican dishes or recipes?

Lemon Garlic Salmon over Rice

Lemon Garlic Salmon

I stumbled upon this recipe while searching for Lemon Rice. Long, long ago I had a recipe for a delicious lemon rice but I think it must have been in one of the cookbooks I gave away when we moved. So I went on an internet search, and found this little gem Lemon Garlic Salmon by 40 Aprons. Go check it out. She has some awesome pictures and nutritional/diet facts.

Basically I followed her recipe to the tee, except left out parsley and put some of the lemon garlic butter sauce (repeat slowly: lemon garlic butter sauce, lemon garlic butter sauce, lemon garlic butter sauce, it sounds soooooo good, doesn’t it? It is! Trust me!) over brown rice. So good!

A funny thing happened to my minced garlic after cooking the sauce. It turned a strange blue-ish green color. Apparently it’s not uncommon. Garlic has naturally occuring sulfer compounds that might react to a very small amount of copper. Sulfer compounds and copper make a copper compound which is a blue-green compound. Copper can come from the lemon juice or the butter. It’s also frequently found in normal water supplies too. Perfectly safe to eat.

Ingredients:

  • 1/4 cup butter (please don’t use margarine, it just won’t be the same)
  • 6-8 garlic cloves , minced (only true garlic lovers need apply, lol)
  • 1/4 cup chicken broth
  • 1/4 cup fresh lemon juice (I’m a firm believer that using fresh lemons, not bottled, is the best way to go, always)
  • Sea salt
  • 1 tablespoon olive oil
  • 4 salmon fillets about 6 oz each, patted dry
  • Fresh cracked pepper
  • Fresh lemons, sliced for garnish
  • Rice

Remove salmon from the refrigerator 10-20 minutes before cooking. Sprinkle both sides with salt and pepper. This is a good time to start the rice. We prefer brown rice, which can be found here as “Integral” Dacsa which is a long grain rice. The cooking time for our rice is 25 minutes, using the stove top method.

Make the lemon garlic butter sauce: In a small saucepan, melt the butter over medium heat. Add the garlic and saute 1-2 minutes or until fragrant. Add in the chicken broth, lemon juice, and a few pinches of salt. Simmer until it’s reduced by 1/3 to 1/2. It will turn into a slightly more thicker sauce. Remove from heat and set aside.

Making the salmon in 3 easy steps:

  1. Heat olive oil in a large saucepan over medium-high heat until it’s shimmering (like a vampire in the sunlight, we don’t always have to be serious, right?)
  2. Carefully place salmon fillets skin side up and cook until lightly browned on the bottom, about 2-3 minutes or until crispy. Carefully flip, taking care not to flake off any meaty bits. Cook 3-4 minutes on second side or until crisp and flesh begins to feel firm to the touch. Remove at this point if you want a medium cooked salmon or continue to cook until the flesh easily flakes with a fork.
  3. Remove pan from heat and pour the lemon garlic butter sauce over. Arrange lemon slices over, if so desired. Remove the skin easily with a spoon. Place salmon over some cooked brown rice and add more lemon sauce over salmon and rice.

Que rico!

Fried Milk – Spanish Street Food

Did someone say dessert … somewhere miles and miles … away? I thought so. But it sounded like someone said “Fried Milk”. Did I hear that right? Yes?!! What the…Hallelujah!!

Photo: Flickr | Javier Lastras

When I first came across Fried Milk (Leche Frita) my jaw nearly dropped to the ground. I knew right away I had to try it. Have you ever had it or heard of it before? I don’t know, maybe it’s something that you can find at a fair of some sort , along with fried snickers or fried butter (??? ewwww) and I’m completely out of the loop. All I know is that it sounded AWESOME and I definitely needed to make it. Making the world a better place, one recipe at a time. Hahahaha!

Sometimes your first try ends in a large glass (or two) of “defeat”. Luckily, I had a nice chilled Ribeiro waiting for a moment just like this. No use crying over split milk. Again, I think I got a little over zealous and starting cooking before I was truly ready and prepared. I also needed to figure out if I had cornstarch or corn flour and/or are they one in the same. It’s hard to tell when your box labels it as both, in Spanish. Once I finished my little bit of research and wrote the steps down in an order that worked better for me, it was a cinch. The next day, my new batch went much, much better.

Hopefully, I’ve laid out the instructions nicely for you so you’ll have success the first time around. I hope you enjoy this delicious treat.

Fried Milk

  • 750 ml whole milk – divided
  • 1 cinnamon stick
  • half the peel of 1 small lemon **see notes**
  • 1/2 cup fine corn flour
  • 3/4 cup of sugar – divided **see notes**
  • 1/2 teaspoon ground cinnamon
  • 1 egg
  • 1/4 cup flour
  • safflower oil, for frying, approximately 1/4 cup ** see notes**

Lightly grease a 8 x 8 inch container (or two 25 fl oz /0.75 l heavy square plastic containers) with soft butter. Set aside.

Mix 1/2 cup corn flour (maizena harina de maiz) with 120 ml room temp milk. Set aside.

Pour the rest of milk into pot, add cinnamon stick and lemon peel. Heat the milk to a boil, once it’s boiling add 1/2 cup sugar, and boil for 10 minutes, on low to medium heat (hot enough to keep a boil), stirring occasionally. After 10 minutes remove the cinnamon stick and lemon peel. Add corn flour mixture into boiling milk. Milk will start thickening, make sure to continuously stir at this point otherwise it will burn on the bottom of pot.

Once it thickens to a pudding consistency, transfer to the greased container, up to a depth of 3/4 inch. Let sit until at room temperature, than put it in the refrigerator for at least 3 hours or overnight.

Prepare for frying: Add oil to a skillet , heat to medium-high. While oil is heating up, set up 3 separate bowls for dipping. 1) 1/4 cup flour, 2) one beaten egg, and 3) 1/4 cup sugar and 1/2 tsp cinnamon mixed, set this one aside till the end.

Slide knife around sides of container so that it comes out easily, lay a plate on top and flip it over, tap bottom of container, and lift. Cut into 2 to 2 1/2 inch pieces.

First coat the pieces in flour, then coat with beaten egg, fry the pieces in oil on medium heat, fry till golden brown on all sides, transfer to paper towel lined plate to remove excess oil, coat with sugar and cinnamon mixture.

Serve.

Notes:

  • when peeling lemon, try to get as little of the white bit, the white part will cause your dish to be bitter
  • you want enough oil to cover the bottom of your skillet to a depth of 1/4 to 1/2 inch, no need to deep fry the pieces
  • for this recipe, I actually used brown sugar, because that is what we had on hand (waste not, want not) it gave it a nice caramel color but of course the original recipes calls for white sugar, either works just fine but I would recommend using white (if possible) at least for the cinnamon sugar

Is this your first time hearing about Fried Milk? Please leave me a comment and let me know either way.

Black Bean Soup with Codillo Jamon (ham knuckle)

If you read my previous post for Spanish Potato Salad with Tuna you’ll remember that finding black beans here is not so easy. But at last, I found some at a Carrefour hypermarket, kind of like a Target or Walmart Superstore, but smaller.

Black Bean Soup with Ham Knuckle

I love beans! My favorites are black, garbanzo, and lentils. I love them in soups, salads, and just about anything. Let’s not forget about desserts too, such as, Black Bean Brownies and Sweet Red Bean Paste. Yum!

Recently, I made a batch of pinto beans cooked with ham knuckle. It reminded me of my Mom’s beans, which I haven’t had in years. We poured them over brown rice. It was delicious and went perfectly with the summer storm we were having. I had never seen or used ham knuckle before that. It doesn’t have much meat, so if you like some meat in your beans, go ahead and add some chopped ham during the last 30 minutes of cooking. That’s what we did for the pinto beans but for the black beans I left the meat out.

You don’t see a lot of black bean recipes calling for ham hocks or knuckles , why is that? I thought I would give it a try.

Since I’m not always great at planning ahead, I used the quick soaking method to prepare the beans. Which is:

Quick soaking method: Place beans to a large pot, cover with at least 3 inches of water above the beans, bring to a boil, reduce heat to a simmer uncovered for 2 minutes; turn off heat, cover pot, and let beans soak for an hour. Drain and rinse.

Now you’re ready to cook the beans.

Black Bean Soup with Ham Knuckles

Serves 4 to 5

  • 1 lb dry black beans, soaked (see instructions above)
  • 1 pkg (304kg or there about) ham knuckles/codillo jamon
  • 8 cups water
  • 2 bay leaves
  • olive oil
  • 1 medium onion, chopped (we always have red on hand, so that’s what I used)
  • 1 red bell pepper, chopped
  • 2 carrots, peeled and diced
  • 2 ribs celery, diced
  • 2 large garlic cloves, minced
  • 1 tablespoon ground cumin
  • 1 15oz canned diced tomatoes, drained
  • freshly ground pepper (to taste)
  • 2 tablespoons fresh lime juice
  • salt (to taste)

Optional: 1 1/2 cups cooked ham

To a large pot add: soaked beans, ham knuckles, bay leaves, and water. Bring to a boil. Reduce heat and simmer, covered for 1 1/2 hours.

While beans are cooking, prepare the vegetables. Heat 2 tablespoons of olive oil in skillet. Add onion, carrot, celery, and red pepper. Toss to coat in oil and sweat vegetables on low-medium heat, stirring frequently for 4 to 5 minutes. Add garlic and cumin by clearing a space in the middle of the pan, drizzling extra olive oil if needed. Cook until fragrant, about 45 seconds, stirring constantly. Remove from pan and set aside.

Remove ham knuckles and bay leaf; add vegetable mixture and tomatoes to pot. Season generously with fresh ground pepper, but don’t add any salt at this point. Transfer 4 cups of soup to a bowl and puree with hand mixer (do this in 2 batches if necessary). Return to pot.

Bring to a boil, reduce heat to a simmer, uncovered, for 30 minutes (optional: this is when you would add the cooked ham if adding). As the soup simmers, you may see a bit of foam on the top. If so, skim it off and discard. Add lime juice and adjust seasoning with salt, as needed.

Ladle soup into bowls, top with a dollop of sour cream (or queso fresco batido), squeeze a little more lime if you’d like and garnish with cilantro. That’s it!

What are some of your favorite bean recipes?

Chorizo A La Sidra

Do you ever get over-excited about a recipe or a plate of food and start eating it before you get a picture (you know, to show all your friends how good you eat, hahaha)? That’s me! Most of the time.

Photo credit goes to Victor Bayon via Flickr CC

There are lots of different ways to make this recipe but I like the simple things in life, so I went the ultra simple path (see original recipe here: Cider Sausage). The magic happens with the quality of ingredients. Use the best ingredients possible.

I cooked the sausages whole and then sliced them afterwards. From my experience, if you slice, than cook, the slices tend to curl up and shrink.

The Asturias here in Spain are famous for their Sidra. I have to admit I was looking forward to a little taste test myself. After using almost the entire 70cl (700 ml) bottle, I had just enough for a few sips. It was great. It was less sweet than the typical US cider and a little dryer too. Salud!!

Chorizo A La Sidra

Serves 4 to 6 (as appetizer)

Ingredients:

  • 500 grams fresh or semi-cured chorizo
  • 70 cl (700 ml) hard cider
  • 2 bay leaves

Optional ingredients to add to sauce:

  • 1/4 cup apple cider vinegar
  • 1 tablespoon smokey paprika
  • 1/4 to 1/2 teaspoon of beef boullion
  • salt and pepper to taste
  • parsley or chives, chopped, to serve

Instructions:

Prick the sausages a few times with a fork or toothpick.

Place the sausage and bay leaves in a small pot and cover with cider.

Heat over high heat until it starts to boil, then let it simmer for half an hour.

Take out the sausages and slice.

If you would like to add a little more favor variety to sauce, then continue cooking sauce, and add optional ingredients. Cook for another 5 minutes until favors are combined.

Serve.

Summer Veggie Gnocchi with Brown Butter

Gnocchi made right tastes like warm soft potato pillows in your mouth. Really! Of course when I say “made right”, I mean the refrigerated kind, or at least the ones I’ve found here. Making my own is far more work than I have the space or energy for.

For awhile it seemed like Brown Butter was the “in” thing to cook with. I saw lots of recipes calling for it. It intrigued me but I hadn’t given it a try until this recipe. It’s true, it has a nice rich nutty flavor and adds more richness.

Gnocchi and real butter are easy to find in Spain. And the fresh vegetables here taste so good, especially the tomatoes. I’ve had some of the best cherry tomatoes of my life here.

I had to revise the original recipe a bit. My local supermercado isn’t the biggest store around. It has a pretty good selection of fresh produce and selection of items but nothing like supermarkets back home. Click here to see the original recipe : Summer Gnocchi and/or see below for my rendition.

Summer Veggie Gnocchi with Brown Butter

Serves 4

  • 2 tablespoons extra virgin olive oil
  • 1 large zucchini – cut into bite sized pieces
  • 2 to 3 handfuls of frozen mixed veggies (the one I chose had: green beans, carrots, onion)
  • 1/2 onion – chopped (unless of course your frozen mixed veggies include onion)
  • 2 cups halved cherry tomatoes
  • 2 garlic cloves
  • Pinch of red pepper flakes (optional – you may have a hard time finding in Spain, they do not have a spicy pallet)
  • 1 package gnocchi – I prefer the refrigerated kind
  • 1/4 cup salted butter
  • 1/2 teaspoon dried oregano

Directions:

  1. Heat oil in a large skillet on medium-high heat. Add zucchini, frozen veggies, onion, and a pinch of salt. Saute for approximately 5-7 minutes until zucchini is crisp-tender. Add cherry tomatoes, garlic, and red pepper flakes and saute until veggies are lightly browned and tender. Season with salt and pepper to taste.
  2. While veggies are cooking, bring a large pot of water to boil and cook gnocchi to package directions. Drain and add to skillet with the veggies.
  3. Make the brown butter. Heat butter and oregano in a small skillet on low heat. Cook until melted. Continue to cook until eventually starts to foam, stirring regularly to scrape up the bottom and prevent burning. Cook until golden brown, about 5 to 7 minutes. Scrape butter over the gnocchi and veggies. Toss to combine.

What are some of your favorite gnocchi recipes?

Spanish Potato Salad with Tuna and a Smokey Vinaigrette

June, 2019

Spanish Potato Salad with a smokey vinaigrette

This weekend was the Festival Corpus Christi and the Summer Solstice.

In Valencia, Corpus Christi is celebrated by parades of religious persons, such as little girls in their beautiful white confirmation dresses, women and children in their traditional Valencian dresses (seriously beautiful), church volunteers who wear black dresses with black lace shawls fastened to their giant hair combs (they look like the movie renditions of widows) , and men dressed as roman soldiers and characters of the bible. There were floats of dragon, turtle, and strange unknown creatures.

According to Visiting Valencia website Corpus Christi is a demonstration of the coexistence of the religious, symbolic, metaphorical, festive spirit in Valencian society.

Just in time for Summer Solstice, the heat and humidity arrived. Needless to say, it was definitely time to break out the salad and minimal heat/work required recipes for dinner. I found a recipe from MA mediterrasian for Spanish Potato Salad which I revised by cutting out the parsley and eye-balling the measurements. This has become a regular repeat recipe in our home.

It can be served warm or cold. I like it both ways. I’ll serve it warm the first night and then serve the leftovers cold. Que rico!

I like to use the small white potatoes. The ones with the light, thin skins and can be found in a bag or loose. This makes cooking a lot easier. You don’t have to peel the potatoes and because they’re small, it cuts down on your prep time.

Here is Spain beans are found dry or in glass jars. The most popular are garbanzo, cannellini, lentils, and than kidney. Black beans, however, are hard to find but that’s another story for another recipe.

I didn’t always like green olives but the ones here are good enough to convert the toughest critic. I highly recommend giving them a try. The most popular are stuffed with anchovies. I’ve tried them in this recipe and they went really well. If you prefer a less fishy taste, we really enjoy lemon green olives but any green olives will work. Just make sure they don’t have pits.

Spanish Potato Salad with Tuna,White Beans, and a Smokey Vinaigrette

Serves: 4

A Spanish potato salad with tuna and white beans/cannellini beans, that can be served warm and/or cold.

  • 1 lb (450g) small white potatoes – peeled or unpeeled and cut into bite size pieces
  • 1/2 red bell pepper – roughly chopped (I like them a bit bigger than a normal chop size)
  • 1/2 green bell pepper – roughly chopped
  • 1/4 red onion – finely chopped
  • 12 green olives – without pits (see above)
  • 1/2 jar or can cannellini beans/white beans – drained and rinsed (see above)
  • 6 oz (156g) canned tuna in olive oil – drained and flaked
  • 4 tablespoons extra virgin olive oil
  • 2 tablespoons red wine vinegar
  • 2 garlic cloves – finely chopped or minced
  • 1/2 teaspoon ground cumin
  • 1/2 teaspoon smoked paprika, regular paprika, or spicy, to taste
  • 1 teaspoon salt or to taste
  • 1/4 teaspoon ground pepper or to taste

Cook the potatoes in boiling water for 10 minutes. Add the chopped red and green peppers to boiling potatoes for the last 3 minutes. While potatoes are boiling, in a large salad bowl add olive oil, vinegar, garlic, cumin, paprika, salt, and pepper, whisk until combined. Add the chopped onion, drained beans, green olives, and tuna. Once potatoes and peppers are done, drain and add to salad bowl. Toss gently until well combined. Enjoy!

What are some of your favorite potato and/or tuna recipes?

Patatas con Salsa Pimienta (Potatoes with Peppercorn Sauce)

Spaniards love their potatoes. You will find patatas fritas and patatas bravas on every menu in Valencia. Crots also love potatoes and french fries. Ok, ok, ok, who doesn’t like potatoes? They’re delicious and awesome.

When we were in Dubrovnik we happened upon dipping our french fries into peppercorn sauce. It was amazing! Ever since I’ve been craving that taste again. I did some digging online and found a recipe I liked and went out to purchase the ingredients, but of course being in Spain, some of the ingredients weren’t readily available. I gotta say I was a little disappointed but I figured I would continue to look around. Wouldn’t you know, the next day my local market had stocked a peppercorn sauce that was already made and ready to go. Jackpot! Easy-peasy!!

Potatoes with Peppercorn Sauce

Serves – 2

Fried Potatoes:

  • 6 small to medium sized Yukon Gold Potatoes, cut into 1 inch cubes
  • 2 Tablespoons Olive oil, more if needed (see note)
  • Salt & pepper (to taste)

Chop potatoes into bite sized pieces. Heat 2 Tablespoons of oil in skillet on medium-high heat. Once the oil is hot, add potatoes. Let potatoes brown for approximately 7 to 10 minutes, depending on the size. Turning them every 7 to 10 minutes until you can pierce a fork through them easily . (see note)

Peppercorn Sauce:

While I didn’t get to try making the sauce on my own, I did find several great recipes that sounded delicious. Hopefully I’ll be able to try one soon. This one here sounds good and easy, check it out: Black Peppercorn Sauce by Lovefoodies.

Notes:

  • The potatoes need a fair amount of oil in order to get it nice and crispy. If you see that the pan needs more oil, heat up a little (1 to 2 Tablespoons) more in another small sauce pan or skillet. Once warm pour into skillet with potatoes. I wouldn’t recommend pouring cold oil into the pan with the potatoes.
  • The secret to getting a nice crispy browned potato: DO NOT TOUCH potatoes for 7 to 10. Once they have a good char, then turn them and DO NOT TOUCH them again for another 7 to 10 minutes.

The beginning…

When in Spain, order the Cafe con leche. You won't be disappointed.
Cafe con leche

Since grade school, I’ve wanted to travel and live abroad. I remember wanting to be a Cruise Director too like Julie from The Love Boat and on career day talking to a Travel Agent (apparently the school couldn’t find a cruise director) about her job and all the trips she’s taken for free or very cheaply. All with the hope and goal of traveling the world when I grew up. In high school, I wanted to be an exchange student and live in Greece. I dreamt about the places I would go, the food I would eat, the people I would meet, and all the adventures and experiences I would have. It took me a lot longer than I had hoped to start traveling and I haven’t been to as many places as I’d like but I am here now, living in Spain. I am on that adventure! I love cooking, baking, trying new recipes, and love to eat out. It’s my hope to use this blog as a way to document my experiences along the way and maybe evoke some inspiration in others. Thanks so much for reading! Salud!!

Design a site like this with WordPress.com
Get started